
Guess what? I finally bought myself a camera after years of sponging off my housemate!
To celebrate the fact that it can record HD videos, I decided to make a chocolate butterfly tutorial. I have actually made a template for it in a previous post (Butterfly Chocolate Tart) but I figured this time I’d actually do a tutorial on it as well! You can probably tell I am quite the amateur (half the video was out of focus… oops!) but hopefully they get better as I go along.
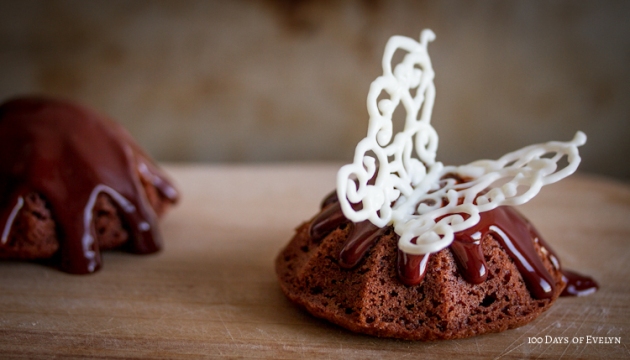
The chocolate cakes were tasty – soft on the inside with a slightly crunchy texture on the outside. The addition ganache made everything taste even better – it always does!
Recipe as follows:
Mini Butterfly Chocolate Cakes
Chocolate Sponge Cake
Ingredients (makes 6 small cakes)
1 egg
1/4 cup sugar
1/3 cup self raising flour
1 tablespoon cocoa powder
1/4 cup butter, melted
Cooking spray
Method
- Preheat oven to 160°C (fan-forced).
- Grease baking tin with cooking spray.
- Whisk egg and sugar together until light in colour and thickened in texture (3-5 minutes).
- Fold in flour and cocoa powder.
- Pour in butter and fold until incorporated.
- Place mixture into a piping bag and pipe into cupcake pan or mini bundt tins.
- Bake for 10-15 minutes or until cakes spring back when pressed.
Chocolate Ganache
Ingredients
30g dark chocolate
50ml cream
Method
- Place chocolate and cream in a microwave safe bowl and microwave for 20 seconds.
- Remove from microwave and stir. Repeat step 1 until mixture is smooth and shiny.
Chocolate Butterfly
For this project, you will need a Butterfly Template (click on link to acquire).
Tips on how to melt chocolate easily also available if required.
Video tutorial link at the top of this page.
Assembly
- Pour ganache over chocolate cakes.
- Place completed butterfly on cake.
Photography
 Above is my photography set up for this project. It was a frantic race against the sunset and I have to say the good news about that is that I’m forced to take a photograph – any photograph – instead of wasting half an hour rearranging various things. The background is a very well worn baking sheet, which you will all be familiar with by now. The light is coming in from the right hand side of the photograph.
Settings
Lens: 60mm 2.8f
ISO: 100
f: 2.8
Photo editing: Lightroom 4
I’m actually getting very sick of my props but I just have not had the time to go and acquire more!
Am hoping to make more video tutorials from now on so if you are interested in that sort of a thing, subscribe to my YouTube channel. I’m pretty excited about it all.

Love the jazzy music! That was a great tutorial video. Looking forward to more.
Thanks – glad you like it! Hoping to improve my video skills as they are currently non-existent. Will have to think of projects that will be fun to show 🙂
Lovely! Have you ever tried coloring the chocolate? Wondering how that would look. What kind of camera did you get and what program did you use to edit your video? Thanks for sharing!
Yes, I have tried colouring chocolate before – in my Lemon Tree Cupcakes post just 4 days ago! I got a Canon 7D and used iMovie to edit. Glad you liked it – hopefully I stay motivated enough to make more. 🙂
Thanks! I’ve been wanting to try recording videos for my blog but I wasn’t sure of the editing process. Again, your work is just lovely.
You should definitely do it if you’ve been wanting to! The editing is not too difficult – I didn’t have a clue about any of it but I just googled my way through the process. Let me know if you make any I would love to watch it! 🙂
Really nice video! I love your chocolate butterflies and now I can see how you make them. 🙂 Thank you!
Thank you – glad you liked it. Will be trying to make more from now on 🙂
Cool video with nice music =)
Thanks, Bonnie! Glad you like it – will be trying to make more in the future 🙂
I enjoyed the video tutorial! As usual, I enjoy your photos!
Thanks, Ada! Glad you liked it – I will be trying to do more of the same in the future. 🙂
Gorgeous! I don’t think you’re too shabby with this video thing either – keep up the good work!
Thanks, Gab! I’ll be trying to make more in the future, hopefully with everything in focus next time! 🙂
Wow! Just Wow! Your skills (photography and culinary) are amazing!
Thank you – glad you enjoyed reading my blog. Hope you enjoy my future posts 🙂
It’s so funny how you used baking tray as the background! So clever 😀
I love all your works..I’m hopeless at baking, it’s just amazing to see how much you can do and they are all so pretty!
I showed your website to my fiancé and my niece and they both love it. They said, it’s funny how you are a dentist and yet, you’re making all those sweet things! 😛 I didn’t think of that before, but I bet you get that a lot. (:
Keep on baking and thanks so much for all those photography tips too!
xx
Khin
Thanks a lot Khin! I’m glad you liked my blog 🙂
Yes, it does seem wrong that I’m a dentist that loves to bake sweet things, doesn’t it? But as long as it’s in moderation it’s okay!
Hope you enjoy reading my future posts. 🙂
one word…. perfection!!!!!
That is so cool!!!!!!!! I am so excited to try this for my Mother’s birthday – thank you 🙂
Hope it turns out well, glad you like them! 🙂